Wednesday, November 21, 2012

BEER RYE BREAD - FOR CYCLISTS AND OTHERS

Hier geht's zur deutschen Version dieses Posts


Long time no see - after I baked four breads from my Equal Opportunity Baking list that I wasn't 100% satisfied with, I got a bit burned out on them. The anal Virgo in me didn't want to continue with yet another Fair Baking Bread without having tried to coax and tweak the grade C candidates to a better performance or more satisfying taste.

Slowly I revisited and rebaked (I learned to use the prefix "re" from the creators of our daily crossword puzzle - it is amazing how you can put a "re" in front of any given verb and come up with a new term never heard of before!) the soso breads, Arkatena Bread, Muesli Rolls (both fine now), Camembert Grape Bread, and then the Beer Rye.

I had picked Bill Middeke's contribution to Kim Ode's "Baking with the St. Paul Bread Club" because of the combination stout and rye. In my opinion nothing made with beer can be bad (unless, perhaps, it's made with Bud Light, aka dish wash water, or other beer abominations).


The amount of sweeteners, molasses and brown sugar (both 1/4 cup for two small loaves), seemed a lot, so I reduced them by half, to 1/8 cup each.

The recipe, originally posted in the "St. Louis Globe-Democrat", had called for lard or bacon fat instead of the shortening listed in Kim Ode's book.

As a German accustomed to cooking with lard, and no friend of shortening, I switched back to the original piggy fat.

For the active dry yeast I used instant, my default, and, also worked with the stretch & fold method, plus overnight cold fermentation, instead of making, and baking, the breads on the same day.

Everything worked well, only the baking time was a bit longer. The bread looked really pretty, but even with the reduced amounts of sugar and molasses it was still way too sweet for my taste!

Bill Middeke, an ardent bicyclist, surely needs sufficient carbohydrates to fuel him for his athletic rides, but my bike carries me mostly to the nearby supermarket, and I get plenty of extra carbs from chocolate and desserts.

Not only that, the best of all husbands complained about the caraway. While I like it, Richard doesn't care for the taste and always finds it overdosed.

So I had another go at the Beer Rye Bread, this time cutting sugar and molasses again by 50%, adding a little more water, to make up for the molasses reduction, and using only 1 teaspoon caraway instead of 1 tablespoon.

We were eager to try the new bread - the sweetness was just right, but with less sugar the bread was a bit bland, and could do with more salt. And my spouse, known to be a delicate little flower, found himself OD'd on caraway again....

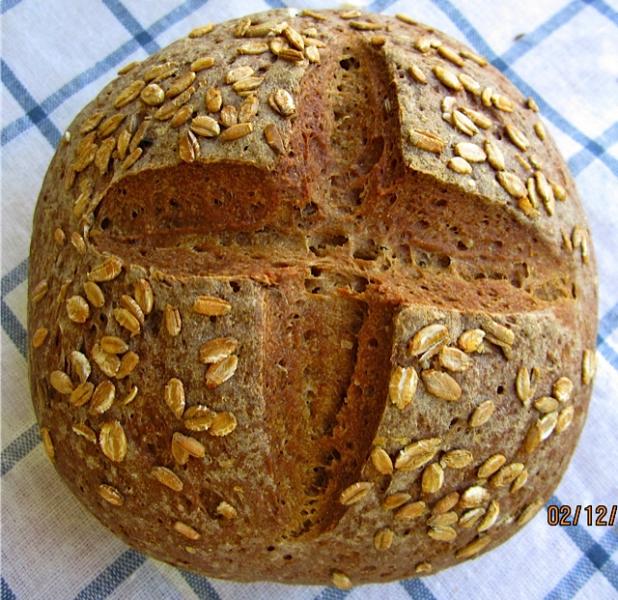
Relentlessly adapted to the Andersons' preferences, this final version received the stamp of approval: a tasty bread, slightly sweet, with a hint of caraway, and full of the good stuff: black Ruthless Rye.
  
"Ruthless" Rye Bread

 BEER RYE BREAD
 (2 small breads)

1 ½ cups stout, or other dark ale (350 g)
70 g water
34 g lard (or shortening)
9 g light brown sugar
21 g molasses
12 g salt
1 tbsp. orange zest, (ca. 8 g)
1/2 tsp. caraway seeds, (or more, to taste)
3 g instant yeast
325 g rye flour
320 g all-purpose flour
rolled rye, for topping

DAY 1:
In saucepan, heat beer and water until just starting to bubble. Add lard, sugar, molasses, salt, orange zest, and caraway seeds. Let cool to lukewarm (not more than 95 F.)

Stir yeast into beer mixture, until dissolved. Pour in mixer bowl, and add flour. Mix at low speed (or by hand) for 1 - 2 minutes, until all flour is hydrated. Let rest for 5 minutes, then knead at medium-low speed (or by hand) for 6 minutes, adjusting with more water or flour, if necessary (dough should be soft and still somewhat sticky.)

Transfer dough to lightly oiled work surface. With oiled hands, stretch and pat into square, first fold top and bottom in thirds, like a business letter, then do the same from both sides.

Gather dough into a ball, place seam side down into a lightly oiled bowl, cover, and let it rest for 10 minutes.

Repeat this stretch and fold 3 times, with 10 minute intervals. After last fold, cover and refrigerate overnight. (I divide the dough at this point in halves, and refrigerate it in two containers.)

DAY 2:
Remove dough from refrigerator 2 hours before using, it should have doubled.

Preheat oven to 425ºF/220ºC, including steam pan.

Shape dough into 2 small boules or bâtards. Place on parchment lined baking sheet, seam side down, and score. Mist or brush with water, sprinkle with rolled rye, cover, and let rise until doubled, ca. 60 minutes or longer (finger poke test, an indentation should not fill up again - if this soft bread is under-proofed, it bursts open in the oven)

Bake breads at 350ºF/180ºC for 20 minutes, steaming with 1 cup boiling water. Rotate breads 180 degrees, remove steam pan, and continue baking for another 20 - 25 minutes, until deep golden brown and registers at least 195ºF/91ºC.)

Cool on wire rack.

Whether oval or round - Beer Rye Breads are very attractive


Submitted to YeastSpotting

Sunday, November 18, 2012

PAN DE MUERTO - BREAD OF THE DEAD


Hier geht's zur deutschen Version dieses Posts


When we traveled for the first time to the Yucatan, I wanted (of course) to try some typical Mexican breads. The bakeries in Cancun and Tulum had beautiful displays, and we were very eager to purchase a selection of those pretty little breads and pastries.

But what a disappointment! The attractive exterior was misleading - everything we bought tasted more or less bland and sweet.

Breads and pastries in Tulum - a pretty disappointment

I couldn't believe that this was all there is to Mexican breads. Moreover, I remembered having seen once a ghoulishly decorated bread for Halloween, and, back at home, consulted with my trusted advisers on all things food - "Fine Cooking" and "Cook's Illustrated".

Fany Gerson's recipe for Pan de Muerto in "Fine Cooking" seemed promising, and had already some good reviews.

This Bread of the Dead is traditionally baked during the last weeks of October, before the Dia de los Muertos (November 1 and 2), and eaten at the cemetery, at the grave of a family member. The bone decoration is a reminder of the deceased, and the little roll on top represents a tear of grief.

I made some slight changes to the original recipe, substituting 10% of the white flour with whole wheat, and changing the technique to my preferred stretch and fold (S&F), with a slow overnight rise in the refrigerator.

A detailed instruction for S&F you can find in my earlier post here. This elegant do-ahead method requires less kneading, ensures better flavor development, and, also, fits better in my schedule.

Since other reviewers of the original "Fine Cooking" recipe warned that the actual baking time was shorter than stated in the instruction, I checked early, and found that my breads were done in approximately 36 minutes.


PAN DE MUERTO  (2 Breads) (adapted from Fany Gerson's recipe in "Fine Cooking")

127 g/4.5 oz whole milk, (1/2 cup)
  78 g/2.75 oz unsalted butter (5 1/2 tbsp.), cut into small pieces
3  4x1-inch strips orange peel (without pith)
1 tbsp. orange blossom water (or more)
       3 eggs, lightly beaten
    6 g/0.2 oz instant yeast (2 tsp)
400 g/14 oz all-purpose flour
  47 g/1.75 oz whole wheat
  50 g/1.65 oz sugar (1/4 cup)
    2 g/0.1 oz salt (1/2 tsp)
  14 g/0.5 oz butter (1 tbsp) melted, for brushing
  22 g/0.8 oz sugar (1/8 cup) for sprinkling

Peeling the orange with a vegetable peeler is easy
DAY 1
1. Put milk, butter, and orange peel in small saucepan over medium heat; stir until butter melts, 2-3 minutes. Remove from heat and let cool until warm. Discard orange peel, add orange blossom water, and whisk in eggs.

Heat milk, butter and orange peel, until butter is melted

 2. In mixer bowl, stir together flour, yeast, sugar, and salt. Add milk mixture, then mix at low speed until dough comes together and all flour is hydrated (1-2 minutes). Let dough rest for 5 minutes.

3. Resume kneading at medium-low speed for 6 minutes, dough should be smooth but still slightly sticky. (Resist the urge to add more flour, it is not necessary!)

4. Place dough on lightly oiled work surface. With oiled hands, stretch dough into a square and fold it in thirds like a business letter. Repeat this folding from both sides. Make a ball, pulling edges underneath, and place it in lightly oiled bowl. Cover with plastic wrap, and let rest for 10 minutes. 

Starting the stretching and folding


5. Repeat this stretch and fold (S&F) 3 times, in 10 minute intervals. After last fold, place dough, tightly covered, in refrigerator overnight. (Remove from the fridge 2 hours before using.)

DAY 2
6. Cut a piece about 120 g/4.2 oz off the dough and reserve. Divide remaining dough in halves and shape pieces on lightly floured surface into 2 rounds. Place rounds on parchment lined baking sheet and flatten tops with your hands.

7. With some of reserved dough, form 2 small rolls  (à 7 g/0.25 oz), cover with plastic wrap and set aside.

8. Divide rest of reserved dough into 6 equal pieces. Roll into ropes (slightly longer than width of loaves.) Starting in the middle, pinch or twist ropes with your index and middle fingers about 1 inch apart to make knobs (the pinched parts should be really thin, to preserve the bone pattern)


The ropes are quite elastic, you can stretch them to the desired length

6. Arrange 3 ropes on top of each dough round, overlapping in the center and tucking ends under a bit. Mist with baking spray, cover with plastic wrap and let rise in warm place, about 45 - 60 minutes, or until breads are doubled in size. Poke dough gently with your finger, the indentation should not fill back again (if breads don't rise long enough they will burst in the oven and destroy the pattern!)


7. Preheat oven to 350°F. Adjust rack in oven middle.

8. Dab a little cold water on top of each round where ropes meet, and put reserved dough balls on top, pressing slightly so that they stick.

Pan de Muerto - decorated with bones and tear drops

9. Bake breads for 18 minutes, then cover loosely with tin foil, and continue baking for another 18 minutes, or until they are golden brown (internal temperature at least 190ºF.)

10. Let breads cool for a few minutes on wire rack. Then brush them all over with melted butter. Holding loaves from the bottom, sprinkle sugar over the top, tilting them slightly to help coat them evenly.

Variation: Use 147 g /5.2 oz whole wheat and only 300 g/10.6 oz all-purpose flour. For the whole wheat, adjust with a little more milk, to keep the dough from getting too dry, it should be slightly sticky.

Delicately orange flavored Pan de Muerto - better enjoy it before you are dead!

Submitted to YeastSpotting and BYOB

Sunday, November 11, 2012

SOUR CHERRY PIE - BIRTHDAY CAKE FOR MY LOVE


Hier geht's zur deutschen Version dieses Posts


When I asked the best of all husbands what kind of cake he would like for his birthday I was pretty sure that he would wish Sachertorte, as usual (he always orders Wiener Schnitzel when we are in Germany, too.) But with an impish grin he retorted: "SOUR CHERRY PIE!".

In principle there's nothing wrong with that - I love pies - but this is a hot button issue in this house. My late mother-in-law was an excellent cook, and, although, like me, an American by marriage only, she mastered this Anglo-American pastry to perfection.

My first trials at making a pie crust ended the same way as my first efforts to bake muffins. As a German used to mix the heck out of cake batters so that no loose flour or (shudder!) lumps of butter remain, my muffins resembled mini pound cakes and my pie bottoms short crust.

Confronted with my first creation, after slaving away for hours in the kitchen, the love of my life uttered the fateful words: "It's not bad, but not quite right, it's not like my mother's. Her sour cherry pie is Thee Best!"

I swore to myself to do better. At my next trial my crust turned out a little flakier, and I wasn't covered in sweat quite as much, but:

"It's not like my mother's - her crust is really flaky!"

After diligently studying numerous baking books and food magazines I finally managed to produce a buttery pie crust that was neither tough, nor too brittle, and didn't get damaged in transition to the pie pan.

"Not bad," conceded my spouse - but somehow the cherry filling of his mother tasted better! That was the last straw - I'd had it. I swore I would never bake another cherry pie as long as stark ingratitude and unflattering comparisons could be expected in this household.

Not that I didn't try to pry the secret of her cherry pie from my wily Venetian mother-in-law when she was still alive. But she eluded easily all sneaky trials to find out, and direct frontal attacks she parried by claiming old age and forgetfulness.

But birthday is birthday, after all, and I had rashly promised the best of all husbands to fulfill his cake wish (are pies really cakes?)

Every baker knows that too much water makes a pie crust tough, but a drier dough is brittle and difficult to work with. Thanks to Cook's Illustrated's scientific approach, this was no longer a problem for me. Unlike water, the alcohol in their Basic Pie Crust with Vodka has the ability to moisten the dough without encouraging gluten development. (Don't worry, you won't taste the vodka.)

I like my pie crusts a little heartier, and exchange a quarter of the white flour with whole wheat or spelt, or, sometimes, substitute 2 tablespoons of flour with nutmeal.

Unfortunately, fresh sour cherries are hard to find in Maine - my own harvest was still a bit too meager this year. Therefore I use lightly sweetened Morello cherries from a glass.

Our little sour cherry tree had 5 cherries this year!
For the filling I adapted a recipe from William-Sonoma "Pie & Tart", but reduced the sugar content and added some lemon zest.

The pie has a decorative lattice top that is easier to make than it looks. Here you find instructions on how to weave it.

You can prepare the crust using a food processor or stand mixer. But keep in mind: for the food processor the fats have to be ice cold, but for the stand mixer fat at room temperature works best.

Weaving a lattice crust is easier than you think

PIE CRUST WITH VODKA
355 g (2 1/2 cups) all-purpose flour (I exchanged 2 tablespoons flour with toasted almond meal.)
1/2 tsp. salt
2 tbsp. sugar
170 g (1 1/2 sticks) cold*) butter, cut in 1/2 cm/1/4" slices
  80 g (1/2 cup) cold*) vegetable shortening, cut in 4 pieces
  1/4 cup/60 ml cold vodka (required, don't substitute)
  1/4 cup/60 ml cold water

*) if you use a mixer instead of a food processors, the fats have to be at room temperature!

CHERRY FILLING
65 g sugar
2 tbsp. corn or potato starch
1 pinch salt
750 g pitted sour cherries (glass), drained (reserve 40 ml of the liquid)
1 tsp. vanilla extract
1/2-1 tsp. lemon zest

Instructions for food processor
Briefly pulse 200 g (1 1/2 cups) of the flour with salt and sugar. Add butter and shortening, and process, until uneven clumps (like cottage cheese curds) start to form, and all flour is coated. Scrape bowl with rubber spatula and redistribute dough evenly.

Add remaining flour and pulse 4 - 6 times, until mixture is evenly distributed around bowl and has been broken up. Empty mixture into medium bowl.

Instructions for stand mixer:
(Butter and shortening have to be at room temperature.) Briefly mix 2/3 of the flour, salt and sugar at medium-low speed, until combined. Add butter and shortening and mix just until dough forms rough ball around paddle.

Scrape bowl with rubber spatula, and add remaining flour. Mix very briefly at medium-high speed, until dough has just broken up in smaller pieces. Transfer to medium bowl.

Sprinkle vodka and water over mixture. With rubber spatula, use folding motion to mix, pressing down on mixture until dough is slightly tacky and sticks together.

Divide dough into 2 equal balls and flatten each into 4-inch/10 cm disk. Cover each with plastic wrap and refrigerate at least 45 minutes (or up to 2 days.)

Remove 1 disk from refrigerator and roll out on generously floured work surface to 12-inch/30 cm circle about 1/8-inch/3 mm thick.

Roll dough loosely around rolling pin and unroll into pie plate, leaving at least 1-inch/2.5 cm overhang. Ease dough into plate by gently lifting edge of dough, while pressing into plate bottom with other hand. Refrigerate until dough is firm, ca. 30 minutes (or freeze for 15 minutes.)

For the filling, stir together sugar, starch and salt in a small bowl. Place drained cherries in large bowl. Sprinkle with sugar/starch mixture, and toss around until evenly distributed around cherries.

Add vanilla and reserved cherry juice, stir until well combined. Immediately spoon filling into pie crust, and top with butter pieces. Place in refrigerator.

For the lattice crust roll out second piece of dough in the same way to 12-inch/30 cm circle. Using pizza roller or sharp knife, cut into 16 stripes (1 1/2-inch/2 cm wide). (See here for instructions.)

Place one half of the stripes horizontally across cherry filling (starting with long stripe in the middle).  Fold the 2., 4., 6. and 8. stripe in the middle, and over to the left side. Then place a long stripe vertically in the middle of the pie, (across stripes that are not folded over.) Unfold stripes back, so that they lay over the vertical stripe.

Fold over 1., 3., 5. and 7. stripe to the left. Place another stripe vertically on filling. Unfold stripes back, so that they lay over vertical stripe.

Continue weaving this way, until half of the pie is covered. Then start weaving the other side, folding every other stripe to the right. When the lattice crust is done, shorten overhanging stripes, until the are level with rim of the pie pan.

Put rimmed baking sheet, upside down, in lowest position, and preheat oven to 425ºF/220º C.

Place pie on hot baking sheet and bake for 15 minutes. Reduce temperature to 350ºF/180ºC  and continue baking for 40 - 50 minutes, until crust is deep golden brown, and filling is bubbling at the rims.

Let pie cool on wire rack.

TIP: To warm up pie, bake for ca. 10 minutes in preheated oven at 350ºF/180ºC. You can also freeze the pie, wrapped in plastic foil, in a zipLock bag.


Cherry Pie - fresh from the oven

Friday, October 5, 2012

HONEY OATMEAL BREAD - BEES WOULD LOVE IT

Hier geht's zur deutschen Version dieses Posts (folgt noch)
It's already October, and still warm and nice. The cats are mostly outside, and Ruffi The Ruffian, our big red tom cat, comes in only when he pleases - he is the only one who can't be bribed by food. 

Roamin' Ruffi, for once at home, resting in his favorite place

My thoughts are already on my upcoming trip to Hamburg, to see my family and friends, and my desk is covered with even more papers than usual: it's high time for the taxes, and I'm procrastinating.

The A(vid) B(akers) C(hallenge) for October was another welcome distraction. We are baking our way through Abby Dodge's "The Weekend Baker", and this month's recipe is "Honey Oatmeal Bread".

  Following Abby's do-ahead option of mixing the dough the day before, then letting it slowly rise overnight in the fridge, was a no-brainer - I do this with almost all of my breads.
You do most of the work the day before, the dough rises while you are sleeping, and, as additional benefit, the taste improves if you give it more time to develop.

I had read about some other bloggers problems with the bread getting too dark in the oven, and there is nothing wrong with your ovens or your baking abilities. The given temperature, 375º F, is simply too high!

According to master baker Peter Reinhart, rich breads with milk, eggs, fat and sugar are best baked at 350ºF, and that works just fine!

Looking at the list of ingredients I stumbled over the staggering amount of sweetener. Okay, this is supposed to be a HONEY oatmeal bread, but 1/3 cup? 

Though I adapted somewhat to Americans' Love of Sweet during my eleven years as a Mainer - I now can eat pancakes with syrup - my stubbornly German stomach still revolts against a really sweet bread.

A bread is a bread - and not a cake! I want to eat it with ham, cheese or salami. And if I want it sweet, I put honey (or jam) on it, not in it. I reduced the amount of honey by half.

From my experience I know that you can safely reduce the amount of yeast in many recipes (even in Peter Reinhart's), especially if you let your dough rise slowly in the cold. 2 1/4 teaspoon/7 g instant yeast are not necessary, 1 1/2 teaspoons/5 g are enough, even for a rich bread like this.

Instead of long kneading I prefer the elegant stretch and fold technique. Even very sticky doughs can be handled - and tamed - with ease, and develop beautifully.

And, instead of brushing the baked bread with melted butter, I applied an egg wash - with more rolled oats as topping.


HONEY OATMEAL BREAD  (adapted from Abby Dodge: "The Weekend Baker")

1 1/4 cups/300 ml whole or 2% milk
             2 oz/57 g old-fashioned rolled oats (not instant)
          3 tbsp/43 g unsalted butter 
        1 1/2 tsp/5 g instant yeast
        2.12 oz/50 g honey
        1 1/2 tsp/7 g salt
   12 1/4 oz/347 g all-purpose flour 
1 egg, lightly beaten with 1 tbsp. water, for egg wash
         rolled oats, for topping
       
DAY 1
Place measuring cup with milk in the microwave and bring to a boil. Stir in oats and butter, and let sit for 20 minutes, stirring once or twice. Stir in instant yeast and honey, until well combined.

Add milk mixture to flour and salt in mixing bowl. Stir on low speed for 1 - 2 minutes (or with wooden spoon) until all flour is hydrated and shaggy mass forms. Let dough rest for 5 minutes.

Knead at medium-low speed for 6 minutes (or by hand). Dough will be a bit sticky, but don't add any more flour (always err on the wet side!)

Transfer dough to lightly oiled work surface. Pat in a rough rectangle. With wet or oiled hands, stretch and fold dough in thirds, like a business letter.

Fold the upper third down...
....then the bottom third up, like a business letter
Then repeat the same stretching and folding in thirds from both sides:

Folding the left side to the right...
....then the right side over to the left
Gather dough into a ball, tucking the sides underneath, and place it, smooth side up, into a greased bowl. Cover, and let rest for 10 minutes. Repeat these stretches and folds (S & F) 3 more times, at 10 minute intervals.

After each S & F the dough will be smoother
After the last S & F, place dough in an oiled container with lid, and place in refrigerator overnight.

DAY 2
Remove dough from fridge 2 hours before using, to warm up. Lightly grease 8 1/2" x 4 1/2" loaf pan.

Transfer dough on clean work surface. Placing your hands in the middle, gently press down to degas. Pat dough into a 7 x 10-inch rectangle. Roll up into a sandwich loaf, pinching seams to seal. Place, seam side down, in prepared loaf pan, then gently flatten with your hands to even it out.

Brush top with egg wash.  Using sharp knife, slash lengthwise. Sprinkle with rolled oats, then gently press with your hands to make sure they stick to the dough.

Preheat oven to 425ºF/220ºC, adjusting rack to middle position. (Steaming is not necessary.)

Glazed with egg wash, slashed and sprinkled with oats
Mist loaf with baking spray, cover, and proof for 45 minutes, or until grown 1 1/2 times its original size. (Poke dough gently with your finger - the dent should slowly come back a little bit, and stay visible, but not fill up again!)

Refresh the scoring if you want the slash to open wider during the bake - I do.

Ready for the oven

Place bread in the middle of the oven, reduce temperature to 350ºF/175ºC, and bake for 20 minutes. Rotate loaf 180 degrees for even browning, and continue baking for another 20 - 25 minutes, until top is golden brown, and it registers at least 195ºF/90ºC.

Remove from oven, turn out onto wire rack, and let cool.

We had the lovely looking loaf, toasted, for lunch. It was still mildly sweet, but its taste blended harmoniously with Black Forest ham, as well as with my Rose Hip Jam.


Next time I bake it, I'll substitute 10% of the white flour with spelt or whole wheat, to add a little more heartiness.

And if you would like to join us, go to Hanaâ's Kitchen, and check out what comes next.

Monday, October 1, 2012

ROSE HIP LEVAIN - MADE FROM JAM!

Hier geht's zur deutschen Version dieses Posts (folgt noch)


When I made my wonderful rose hip jam a month ago, temperatures were in the eighties, t-shirt weather for weeks, and we even used the air condition in our bedroom - in Maine!

The glasses were sitting on the kitchen counter, waiting to be properly tagged before going into the basement. But my husband, immobilized by his broken foot, needed special attention, and, between baking twice a week for our local natural food store, answering student questions online, and taking care of our undeserving critters, I didn't get to it for quite a while.


After a week or so, I noticed that one of the glasses showed ominous signs of frothy activity. Obviously I didn't fill it quite high enough to establish a vacuum, and, with the prevailing heat as incubator, my rose hip jam had started to ferment.

I was pretty annoyed with myself. Why didn't I pay more attention, and place the compromised glass into the fridge, before it could turn itself into booze?

No help for it, this was a goner, and had to be thrown out..... Or not? Suddenly I remembered my experiences with apple yeast water two years ago. Made from fermenting apples, the yeast water had proved to be a powerful leaven, my bread even grew a horn!

But in the end the apple yeast water died a slow death from starvation in a dark corner of my fridge, all but forgotten, since we preferred the tangier taste of sourdough.

Wouldn't it be worth a try to experiment a bit, and see what would happen if I fed the tipsy jam with  flour?


I measured a teaspoon of jam in a little bowl and added equal amounts of water....


.....and whole wheat flour to the bowl:         


5 g fermented rose hip jam + 25 g water + 25 g whole wheat flour.

Eleven hours later the reddish mixture had become bubbly and spongy, and emitted a wonderful fruity-sour smell. I was very pleased and contemplated my next move.

I wanted to make a fairly simple levain, with a bit of whole grain, but not too much. I expected a rather mild taste, but I didn't want the blandness of an all-white bread, nor a too hearty loaf that overwhelmed more subtle nuances.

So I adapted a recipe for Pain au Levain, made with apple yeast leaven, from Jan Hedh's "Swedish Breads and Pastries". I had made this bread before, with apple yeast water, it had been nice, but rather mild.

Hedh's book is gorgeous, with wonderful recipes, though not without some pesky errata - my first attempt of an attractive looking Levain with Bran and Vinegar had ended in a dense, compact brick - thanks to one erroneous Zero too many in the bran department.

Even though it was already evening, I didn't want to wait, and started with 16 g of my newborn rose hip mother - mother, chef and levain are the classic French terms for the 3 steps to make a leaven - to make the second stage: the chef.

Le petit chef before his rest

I woke up at midnight, went downstairs, eager to see how my starter was doing, and found a nicely grown chef, wide awake, and hungry for more.

A really grown-up chef
After feeding the little guy with more flour and water, I tottered back to bed.

The next morning my levain was fully ripened and ready to go!


PAIN AU LEVAIN  (adapted from Jan Hedh: "Swedish Breads and Pastries")

CHEF
21 g mother starter (it doesn't have to be rose hip, an ordinary mature wheat or rye starter will do)
   8 g water
21 g bread flour

LEVAIN
  50 g chef (all)
  50 g water
100 g bread flour

FINAL DOUGH
200 g levain (all)
 16 g spelt flour
 16 g rye meal
282 g bread flour
219 g water
    6 g salt

DAY 1:
1. Mix together all ingredients for chef. Knead for 2 minutes, then let rest for 5 minutes. Resume kneading for 1 more minute. (Dough should be stiff, but not hard, moisten your hands to incorporate more water, if needed.) Cover, and let sit for 4 hours, or until doubled in size.

2. Mix together all ingredients for levain. Knead for 2 minutes, then let rest for 5 minutes. Resume kneading for 1 minute more. (Dough should be stiff, but not hard, moisten your hands to incorporate more water, if needed.) Cover, and let ripen for 5 - 6 hours, or until doubled in size. Knead briefly to degas, and refrigerate overnight.

DAY 2:
3. Remove levain from refrigerator 2 hours before using, to warm up. Cut into smaller pieces and place with flour and water in mixer bowl. Knead for 3 minutes at low speed, then let dough rest for 5 minutes.

4. Add salt and continue kneading for 7 more minutes at medium-low speed. Stretch and fold 1 x, gather dough into a ball, place it in lightly oiled bowl, turn it around to coat with oil, cover, and let rest for 90 minutes.

5. Transfer dough to lightly floured work surface, place hands in the middle and push out the air, stretch and fold 1 x, gather dough into a ball, return it to the bowl, and leave it for another 80 minutes.

6. Push out air again, and let dough relax for 10 more minutes. Shape into a round, place in banneton (seam side up), or on parchment lined baking sheet (seam side down).

7. Sprinkle bread with flour, mist with baking spray, cover, and proof for 60 - 90 minutes (in a warm place), until it has grown 1 3/4 times its original size.

8. Preheat oven to 250º C/482º F, including steam pan. Score bread.

9. Bake bread for 5 minutes, reduce heat to 200º C/400º F, and continue baking for another 15 minutes. Rotate bread 180 degrees, remove steam pan, and bake for 20 minutes more, venting the oven once to let out steam in between.

10. Leave bread in switched-off oven with door slightly ajar for another 10 minutes. Transfer to wire rack and let cool completely.


I changed Jan Hedh's recipe a bit. Instead of long kneading, I added a period of rest (autolyse) while mixing the dough, thereby shaving off some hands-on time.

A total baking time of 60 minutes, as stated in the recipe, was not necessary, my bread was already done after 40 minutes. And leaving it a while longer in the switched-off oven with the door a bit ajar guaranteed a nice crisp crust that didn't soften soon after baking.

Did it taste like rose hips? No. But is was delicious! And not only that: The best of all husbands found it "the crustiest bread you ever made".  

One question remains: what was it exactly that gave the bread its marvelous lift? The rose hips? The apples? Or the red wine the jam was made with?

Rugosa rose and hips

Submitted to YeastSpotting and BYOB


Thursday, September 13, 2012

LEINSAMENBROT - GERMAN FLAXSEED BREAD

Hier geht's zur deutschen Version dieses Posts.


German breads are often made with a combination of three or more flours, and loaves with grains and seeds are, also, very popular.  Flaxseed breads are, therefore, one of the regulars in German bakery shelves.

My Leinsamenbrot, made with bread flour, rye and whole wheat, is a hearty bread with a pleasantly nutty taste and little crunch from the seeds.

Though whole flax seeds, even when thoroughly soaked, do not release much of their nutrients into our digestive system, the little brown specks give the bread an attractive look - and the fiber supports (to put it elegantly) bowel movement.

Like most German everyday breads, Leinsamenbrot makes good sandwiches with ham, salami or cheese, but tastes also good with jam or honey.

Different from Americans, Germans eat their sandwiches mostly open faced - only if they take it to work or school the cold cuts will be covered by a second slice of bread.

I adapted this recipe from one of my old German bread baking books,"Brot backen" by Cornelia Zingerling.

It contains a lot of good recipes, though I "remastered" the techniques to more modern methods, utilizing pre-doughs and autolyse, as well as cold fermentation.

Leinsamenbrot is made with a soaker and biga. I like mixing the dough the day before and let it rise slowly overnight in the fridge.

This kills two birds with one stone, I don't have to wait for the rise, and I don't need to get up too early on baking day.

The heavy lifting being all done, I only take the dough out of the fridge 2 hours earlier to de-chill, and shape, proof and bake the breads.

But you can also prepare the biga in the evening, and the final dough on baking day, but the soaker should be mixed 24 hours earlier, so that the flax seeds have time enough to soften and absorb all the water they need.

To achieve the pretty star pattern, you need a large, star shaped cookie cutter.


Scored with a smaller cookie cutter
LEINSAMENBROT - GERMAN FLAXSEED BREAD    (2 Loaves)

SOAKER
200 g whole rye flour
111 g whole wheat flour
5 g/1/2 tsp. salt
150 g whole flaxseeds
273 g buttermilk
33 g water


BIGA
311 g bread flour
1 g/1/4 tsp. instant yeast
203 g water

FINAL DOUGH
all soaker and biga
78 g bread flour
  7 g salt
  7 g instant yeast (2 1/4 tsp)
19 g/1 tbsp. honey
15 g/1 tbsp. pumpkin seed oil (or other vegetable oil)
    milk, for brushing


DAY 1
In the morning, stir together all soaker ingredients until well hydrated. Cover with plastic wrap, and leave at room temperature. (Soaker will become pretty stiff).

Mix together all biga ingredients at low speed (or with wooden spoon) for 1 - 2 minutes, until all flour is hydrated. Knead for 2 minutes at medium-low speed (or by hand).

Let dough rest for 5 minutes, then knead for 1 more minute. Place biga in lightly oiled bowl, turn around to coat with oil, cover with plastic wrap and refrigerate (up to 3 days). Remove 2 hours before using, to warm up.

In the evening, mix together ingredients for final dough for 1 - 2 minutes on low speed, or by hand, until dough comes together. Knead for 4 minutes on medium-low speed. Dough should be slightly sticky, adjust with a bit more water as needed.

Let dough rest for 5 minutes, then resume kneading for another minute. Place dough in lightly oiled container, turn around to coat with oil. Cover, and refrigerate overnight. (I divide the dough at this point already into 2 portions and refrigerate them in 2 containers.)

The dough has risen overnight in the fridge
DAY 2
Remove dough from refrigerator 2 hours before using, to let it come to room temperature.

Shape dough into 2 boules, and place them, seam side down, on a parchment lined baking sheet. Brush with milk. Score them with a big star shaped cookie cutter. Spray breads with baking spray, and cover them with plastic wrap. (To learn how to shape your bread into a boule, click here.)

Shaped (and cookie cutter scored) boules on baking sheet


Preheat oven to 425º F, including baking stone and steam pan. (To learn how to prepare your home oven for hearth baking, click here.)

Let breads rise at room temperature for 45 - 60 minutes, or until they have grown to 1 1/2 times their original size. (Poke test: gently poke dough to make an indentation, it may slowly come back a bit, but should stay visible.)

Bake breads at 350ºF, steaming with 1 cup of boiling water. After 20 minutes, rotate breads 180 degrees, remove steam pan, and continue baking for another 20 - 25 minutes.

They should be a deep golden brown, sound hollow, when knocked on bottom, and register at least 195ºF (instant thermometer).

Let breads cool on wire rack.

Breads at Hamfelder Hofladen, a farm bakery near Hamburg


Submitted to YeastSpotting and BYOB

Monday, September 3, 2012

VANILLA SPONGE CAKE - THE PERFECT PLUM COMPANION


 August did not start on a good foot - my husband broke his foot in July, and hobbled miserably on one leg and crutches for over six weeks.

Not allowed to put the slightest weight on his foot (it was a tricky fracture that doesn't heal well) he spent a lot of time in bed, until we bought a comfortable chair. And he felt more and more bored, until we brought his guitars and recording equipment down from the third floor.

This was one of the moments where we realized that we are not invulnerable - and our old house with its many stairs and narrow bathrooms is everything but accommodating disabilities.

Not much time for baking, other then my usual breads for A&B Naturals. I felt like in the olden days when I was a single working mom with kids, responsible for everything and all....

But broken bones heal, and last week my husband was allowed to walk ("released from prison!"). Cast and crutches vanished into the basement, and I was finally discharged as nurse.

Just in time for the ABC September challenge - Abby Dodge's Mile-High Vanilla Sponge Cake. You can find this recipe in "The Weekend Baker", or here.

This is one of the pastries that, without the Avid Baker Challenge, I would never have made on my own. Simple vanilla cakes don't have much allure for me, and I consider sponge cakes only as base for elaborate fruit or cream fillings, as in tortes.

But challenge is challenge, so I first cooked a nice, tart plum compote, with red wine and cinnamon, to add some pizzazz to this mild-mannered cake, and cracked my seven eggs for the batter.

I opted for the citrus-y version, with orange juice and zest, and cut the sugar amount by a third: 1 1/2 cups seem way too much!

Instead of adding all the flour to the egg mixture at once, I did it in increments, folding in each addition very gently, before adding the next. This is much easier, and, also, reduces the risk of overmixing.


The cake rose nicely (perhaps a little less than a mile...) It was done after 50 minutes.

It had to cool upside down, standing on the pan's little legs, for three hours, before it could be freed from the mold (like my husband from his cast.)


With the help of a long, thin knife (the one my husband calls his "monkey deboning knife" - to shock young visitors,) it came out of the pan without mishap, shedding only a few crumbs.


At tea time, when the vanilla cake was cut, it showed a luxurious golden crumb (eggs galore!), was not too dry and springy, as a sponge cake should be. 

Together with a generous amount of Gifford's Old Fashioned Vanilla Ice Cream and my aromatic prune plum compote it blended into a very pleasant flavor combination of tart and sweet, vanilla, cinnamon, and a hint of citrus.

Next time I would add even more than 2 teaspoons of orange zest, the cake can take a bit stronger citrus flavor. 

And if you are an avid baker and want to become an Avid Baker - it's never too late to join the fun! Contact Hanaâ (Hanaâ's Kitchen)

Friday, August 24, 2012

ROSE HIP JAM WITH RED WINE & APPLES

Hier geht's zur deutschen Version dieses Posts


Bar Harbor's Shore Path is lined by Rosa rugosa bushes. A Japanese native, these wild roses were introduced to Europe and America, not only for their ornamental value, but because of their extreme salt tolerance and hardiness, helping to stabilize dunes and preventing erosion in coastal areas.

Their flowers, red, pink or white, are beautiful, and their leaves glossy green. But at this time of the year it's their large rose hips that rouse the old hunter and gatherer's instincts.

When I was a child we picked rose hips mainly for their seeds  - the perfect way to annoy classmates with surprise attacks from behind. Those seeds, thrust under the shirt, itched horribly, and were quite difficult to get rid of.

Ripening rose hips
Usually it's our dog, Buffy, who decides when and where to stop, sniff (or do other things related to odors), but now I am the one who lingers among shrubs full of orange red rose hips.

This year we have an abundance of fruits, so that I could pick and choose the fattest and ripest ones - not a meager harvest like last summer, when I was too late, and had to take whatever small, wrinkly fruit was left.
Rose hips contain a lot of vitamin C

The first time I made rose hip jam was many years ago. Following a recipe from food magazine "essen & trinken", I spent hours scraping seeds from the hips, until I was ready to drop the knife.

The jam tasted good, but what a slave labor to prepare it!

When we moved to Mount Desert Island and I saw the abundance of  rose hips, I wanted to give it another try.

Looking for an easier recipe, I remembered the "hobbythek". In this old German TV show, Jean Pütz presented DIY methods for all kinds of interesting things - like cooking with wild plants and fruits.

His rose hip jam doesn't require tedious scraping of seeds, but just the removal of stems and flowers. It utilizes the natural pectin from apples, and the fruits are cooked with red wine. You need some brawn to press the cooked fruit mass through a strainer. If you own a food mill it's a little easier.

Do not try to strain all those fruits at once - your sieve or food mill gets too clogged. Process half of the mass, roughly clean your straining tool, and then do the the other half. This part is a bit strenuous, but the result is well worth the effort! The addition of lemon juice gives the mild rose hip flavor a bright note.

Necessary ingredients
 ROSE HIP JAM (4 - 5 glasses)

1.5 kg/3.3 lb rose hips
750 g/26.5 oz Granny Smith apples
550 g/19.4 oz sugar
200 g/6.8 oz water
100 g/3.4 oz red wine, dry and fruity
juice of 1/2 - 1 lemon
1 package Sure-Jell (for reduced sugar)

Place 4 - 5 clean jam glasses on a paper kitchen towel.

Wash rose hips. Remove stems and flowers. Grate whole apples coarsely.

In a small bowl, mix Sure-Jell powder and 100 g of the sugar.

In a big sauce pan, stir together rose hips, grated apples, water, red wine and remaining 450 g of the sugar. Bring to a boil, cover, and cook on low heat for 1/2 hour, stirring now and then.

Put half of fruit mass through a strainer or food mill to remove seeds and skins. Transfer back to sauce pan. Clean strainer roughly, and repeat with other half of cooked fruits.

Add lemon juice, and sugar-Sure-Jell mix, and stir well. Bring to a boil, and cook on high heat for 3 minutes, stirring constantly.

Pour hot rose hip jam in prepared glasses, filling them up to the rim. Close lids and turn glasses for 10 minutes upside down, to create a vacuum. (If you prefer to use the cook-in-the-glass method, follow the instructions in the Sure-Jell package.)

Wild roses in the Acadia National Park
 This recipe was adapted from Jean Pütz' TV show "hobbythek".